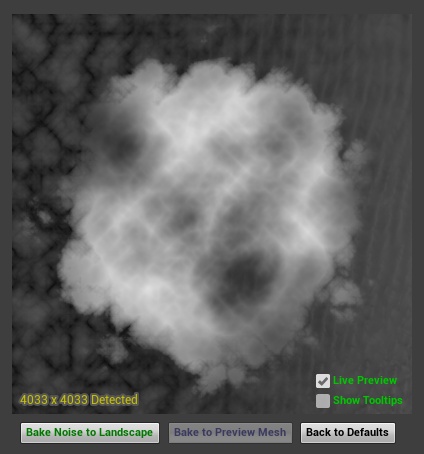
Heightmap Demo Window:
After launching the Map Maker User Interface (MapMakerInterface) you’ll find settings dealing with different aspects of Terrain Generation. This section of the documentation will go over in detail, what each setting actual does in effect to the overall landscape.
To start, you’ll see a demo window appearing at the top of the widget, this is to show a low-resolution version of the Heightmap that will be baked to the landscape. As of yet, erosion does not appear on this mini-map but is visualized on the Landmass Preview Mesh itself. All noise based settings and their effects are displayed upon this mini-map.
Main Interface Buttons:
Live Preview – Enables the viewing of changes on the preview mesh in real-time. Disable this for better performance, while editing, on lower end machines.
Show Tooltips – Turns on the Tooltips for all options in this Editor Widget. This displays help text for each parameter/slider as you hover over it.
Bake Noise to Landscape – Bakes the chosen noise pattern displayed on the mini-map to the Landscape and Preview Mesh.
Bake to Preview Mesh – Bakes the chosen noise pattern displayed on the mini-map to ONLY the Preview Mesh. This button is disabled when “Live Preview” is enabled, because the preview mesh updates instantly when in Live Preview mode.
Back to Defaults – Resets all values inside of the MapMakerInterface back to their default settings.
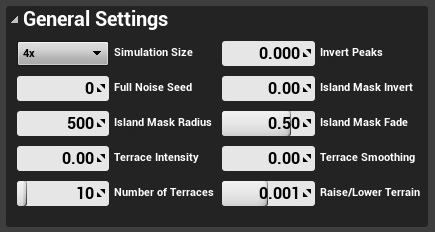
General Settings:
Simulation Size – Settings are either 1x, 4x, or 16x in this area. This setting applies to how large the simulation should be and it’s resulting resolution/detail before upscaling is applied on bake.
Island Mask Invert – Inverts the entire mask, producing edges similar to a regular map, rather than an island.
Full Noise Seed – Changes the entire noise permutation, while still keeping lower settings as they are, this is nice for when you find a good detail setup of lower settings but want different versions of it.
Invert Peaks – This inverts the highest points of the heightmap, it can be used to sculpt the beginnings of volcanoes.
Island Mask Radius – Controls the size of island that will be created, or the size of smoothing applied to the middle of the terrain when the mask is inverted.
Island Mask Fade – Handles the amount of blend that is applied to the edge of the circular mask, this is handy for creating multiple mini islands on maps as well as peaks and valleys when the mask is inverted.
Terrace Intensity – The amount that the terracing effect is enabled on the generator, generally used in creating deserts and canyons or a sediment layering effect.
Number of Terraces – How many levels there will be in the terracing layering effect.
Terrace Smoothing – Smooths the sharp edges of the terracing effect, giving a more organic and less mathematically derived, look to it.
Raise/Lower Terrain – Adjusts the entire terrain up or down, useful for if, after combining many techniques/layers, the generation begins to exceed the bounds. You can easily lower the terrain, using this variable.

Smooth/Blur Settings:
Blur Amount – The amount of blur that is applied when blurring of the heightmap is enabled.
Blur Blend Sharpen – How sharp the transition will be between the landscape and blurring effect. Since blurring is done through a height-based approach, this can be useful for creating soft edges on beaches/sediment.
Max Height of Blur – When blur is enabled, this setting controls at which height that blur should start.
Enable Blurring – Controls whether heightmap blurring is enabled or not.
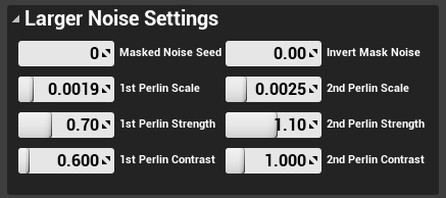
Larger Noise Settings:
Masked Noise Seed – Controls the noise pattern that is used on the internal part of the masking. This setting leaves the edge noise of the masking alone.
Invert Mask Noise – Inverts the internal noise, leaving the edge noise alone. This is useful for create hills rather than peaks on a terrain.
1st Perlin Scale – The size at which one of the internal (non edge) patterns of noise is applied.
2nd Perlin Scale – The size at which the other of the internal (non edge) patterns of noise is applied.
1st Perlin Strength – Controls the intensity at which the first noise pattern is applied to the terrain (warning, this is capped at a certain height as a black and white texture can’t go super white).
2nd Perlin Strength – Controls the intensity at which the second noise pattern is applied to the terrain (warning, this is capped at a certain height as a black and white texture can’t go super white).
1st Perlin Contrast – This controls the smoothness/sharpness of the first noise pattern applied to the terrain.
2nd Perlin Contrast – This controls the smoothness/sharpness of the second noise pattern applied to the terrain.
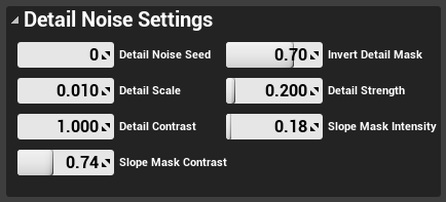
Detail Noise Settings:
Detail Noise Seed – Allows for the picking of which random instance of the fine grain noise you’re wanting to apply to the terrain.
Invert Detail Mask – Controls whether the Detail Noise will be on the inside or outside of the Circular Mask in the center of the generated map.
Detail Scale – The size of the noise that is used in the Detail Noise generation.
Detail Strength – The amount/intensity that the Detail Noise will affect the terrain.
Detail Contrast – How sharp or smooth the Detail Noise will be, how far the highest points are from the lowest points.
Slope Mask Intensity – Since the Detail Noise uses slope detection, this controls how much that slope detection has a masking affect over the detail noise generation.
Slope Mask Contrast – Controls the smoothness of the slope detection that the Detail Noise will be applied to.

Transition Noise Settings:
Invert Trans Noise – Inverts the edge noise pattern applied to the circular masking (edge of the island noise pattern).
Trans Noise Seed – Changes just the edge noise pattern, leaving the center noise alone.
Trans Noise Scale – Sets the size of the noise pattern applied to the edge of the masking.
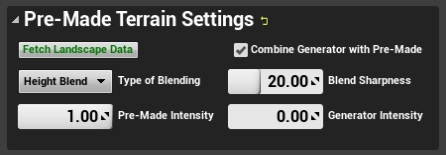
Pre-Made Terrain Settings:
Fetch Landscape Data – Resets the preview mesh to the current heightmap that is applied to your terrain.
This even works with bringing sculpted terrain back into the simulation area.
Important Note: If there is a grid pattern on the Preview mesh after clicking this button, this is because your terrain is not fully loaded into memory yet. To fix this, just fly around on the Landscape that you’re trying to get information from, and press this button again. Doing so will properly load the landscape into memory so it can be read.
Combine Generator with Pre-Made – Allows for the combining of a Pre-Existing Heightmap (the one that’s applied to your landscape right now) with all features of the Terrain Generator, in an either Height-based blending way, or additive.
Type of Blending – Gives you the choice of what method to use in blending the Pre-Made Heightmap, with other parts of the Terrain Generator.
Blend Sharpness – Controls the contrast of how the generator transitions between the Noise Generation and the Pre-Made Heightmap that has been brought into the generator.
Pre-Made Intensity – How much the Pre-Made Landscape that’s been brought in, affects the generator.
Generator Intensity – Controls the amount that the rest of the generator is allowed to affect the Pre-Made Heightmap that’s been brought in.
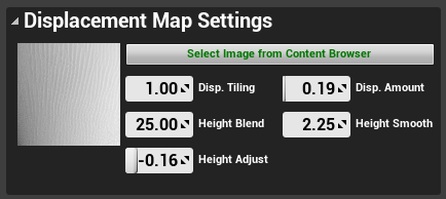
Displacement Map Settings:
Select Image from Content Browser – Allows you to choose the current image that’s selected inside of the Content Browser and apply that as a Displacement Map to the Terrain Generator.
Disp. Tiling – The tiling amount that should be used for the chosen displacement map that’s been applied to the generator.
Disp. Amount – The intensity of the Displacement map that has been applied here in this process.
Height Blend – The height at which the chosen Displacement Map will transition to regular mapping that has been created through the Generator.
Height Smooth – The smoothness/contrast of the transition between chosen Displacement Mapping and the regular terrain.
Height Adjust – Increases/decreases the height on the Displacement Mapping without blending it into the terrain first.
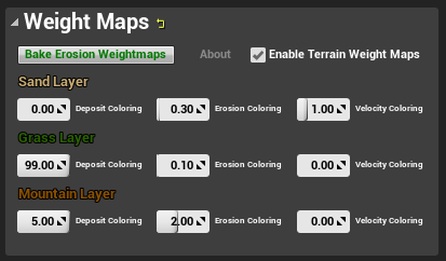
Weight Maps:
Important Note: The Weight Maps section of the terrain generator is still in its experimental phase, as such, some features may not work as expected. This section will be elaborated on in a future update with the ability for the weight map layers to be applied to ANY paint layer of your choosing.
Bake Erosion Weightmaps – Bakes the currently shown erosion weights (the coloring that’s on the Preview Mesh after you start erosion) to the terrain, as either sand, dirt, or grass.
Enable Terrain Weight Maps – Enables the baking of color erosion weights, while the erosion is running (this works best with “Particle Based” erosion as the default settings are set up for it).
Deposit Coloring – Controls the amount of coloring/masking that is to be applied when an erosion particle is at rest for the specific layer (for either Sand, Grass or Mountains).
Erosion Coloring – Controls the amount of coloring/masking is to be applied at the point where erosion is happening on a terrain for the specific layer (for either Sand, Grass or Mountains).
Velocity Coloring – Controls the amount of coloring/masking is to be applied when erosion particles are moving fast, rather than slowly (for either Sand, Grass or Mountain layers).
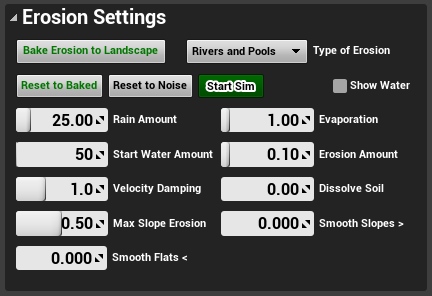
Erosion Settings:
Bake Erosion to Landscape – Bakes the current state of the simulation to the Landscape.
Type of Erosion – Currently their are two settings available in this drop down menu. “Rivers and Pools” acts as something similar to a larger based river simulation, whereas “Particle Based” is more detailed and finer grain.
Reset to Baked – Resets the preview mesh to the current heightmap that is applied to the terrain. This even works with bringing sculpted terrain into the simulation area.
Reset to Noise – Resets the preview mesh to the original noise applied to the terrain, before erosion was applied.
Start Sim – Starts the type of erosion simulation chosen in the “Type of Erosion” drop down menu. This is set to a timer, as it is a heavy process, once this timer reaches 60 seconds, it is automatically turned off, though can be continued. The timer is made as a function to keep people from forgetting that it’s on while draining performance from the editor.
Show Water – Displays the river simulation in the “Rivers and Pools” type of erosion. Show water does not work with the “Particle Based” simulation type.
Rain Amount – Controls the amount of particles or fluid applied to the simulation area on a constant basis while simulating.
Evaporation – The rate at which water is destroyed from the world, lowering this amount allows for pooling.
Start Water Amount – The beginning amount of rain that is thrown onto the terrain at the start of simulation.
Erosion Amount – The intensity at which water destroys or moves parts of the terrain.
Velocity Damping – The speed at which water moves across the map. Depending on the size of the simulation area that you choose, this effect can give a more defined look or cause waves to just overtake the complete map as if a tsunami hit it.
Dissolve Soil – The amount of terrain that is destroyed due to erosion. Normal erosion moves soil from higher to lower spots, this effect actually destroys it, sometimes giving way to cliffs with higher values.
Max Slope Erosion – The maximum amount that the erosion mechanic is allowed to effect slopes.
Smooth Slopes > – Smooths all angles greater than the chosen value, useful for creating mountains and sharp peaks.
Smooth Flats < – Smooths all angles less than the chosen value, useful for creating smoothed planes or removing weird noise patterns on flat areas.
Below are a couple of videos showing off a lot of these functions in action.
The Newest update is shown in the video directly below, the older edition of the editor is shown in the video below that.