Below are all the steps needed to set up both the Auto Materials and the Terrain Generator to work with a terrain that’s made up of pieces that use World Composition. We’ll go over starting a new level from scratch, all the way to procedurally generating your first terrain on a tiled landscape. To see a video version of this Tutorial please check out the video to the right, in there I also go over an extra method for importing a Tiled Heightmap. The text docs below are just there for reference if you get stuck at any point along the way.
If you have any questions, or if something isn’t clear, feel free to reach out to me via the “How Can We Help?” link at the bottom of this page and I’ll answer your question and add it to the Doc, thanks.

Step 1:
M4 now fully supports World Composition for both the Material Blueprint and Terrain Generator as of Version 1.5.1!
To get started, create a new map, save it, then tick the “Enable World Composition” toggle under “World Settings”.
Step 2:
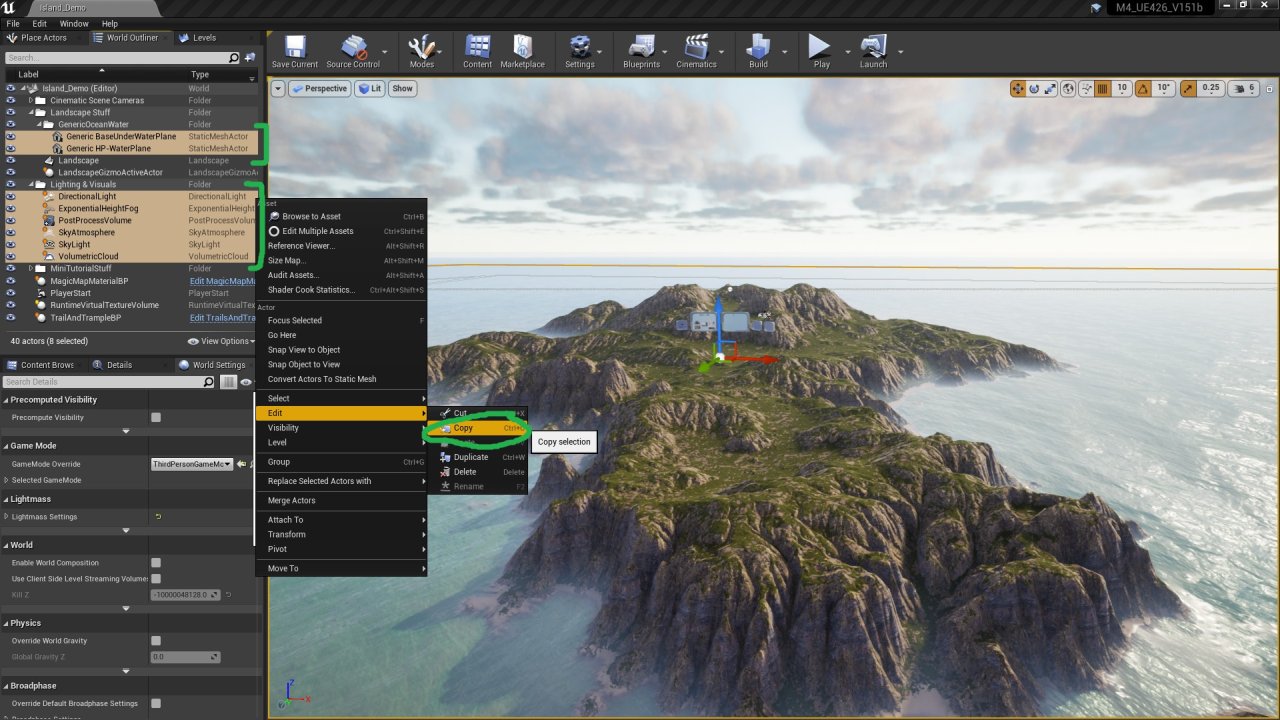
Optionally, next we can copy and paste in the lighting with the ocean meshes from one of the other maps that come with M4, this will quickly get the lighting looking right. To do that, just ctrl+click the things you want to copy from the World Outliner on a another map…lets say the Island_Demo map…then copy them, open up your new level, and then paste them into your new world.

Step 3:
Now we need to open the “Levels” tab in the Editor. To do this, click “Window” at the top of the Editor and click on “Levels” from the drop down menu. A window or Tab will pop up, dock it where-ever is convenient for you.
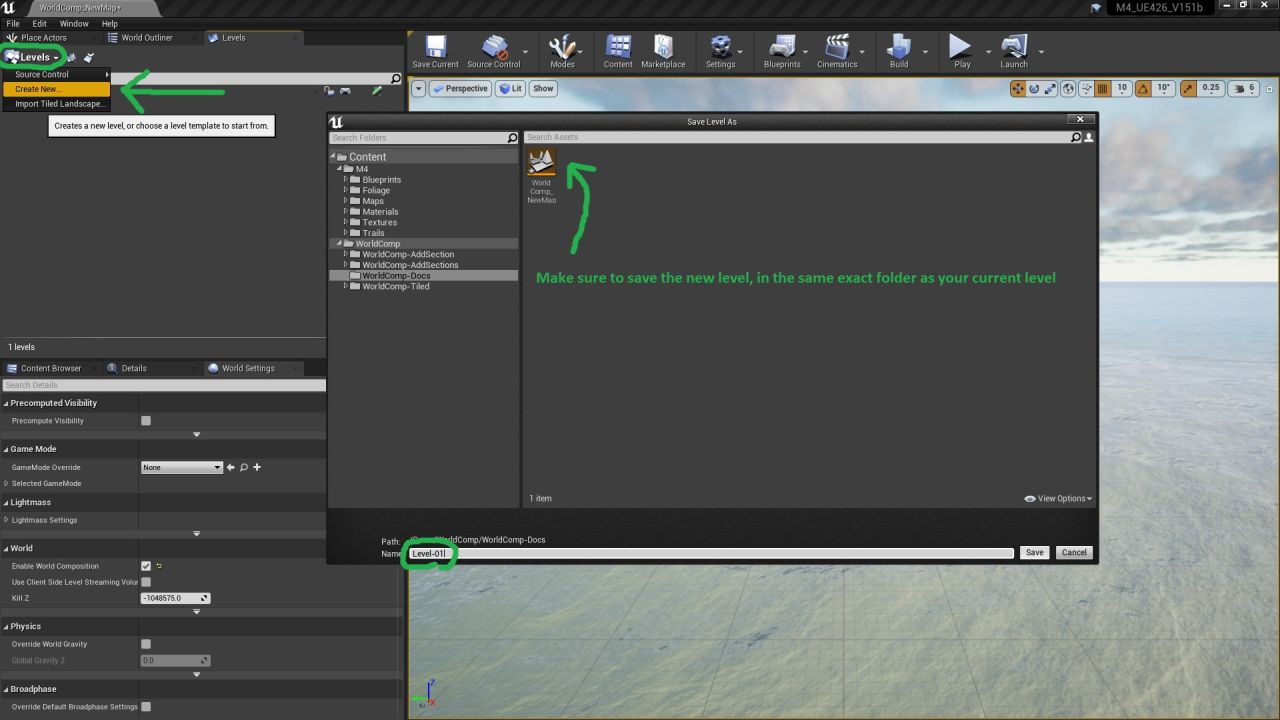
Step 4:
Within the “Levels” tab, click on the drop down menu called “Levels” and select “Create New”. This will open a save menu for your new level piece. Make sure to save this new level in the exact same folder as the Map you already created, else World Composition will not be able to find it.
Step 5:
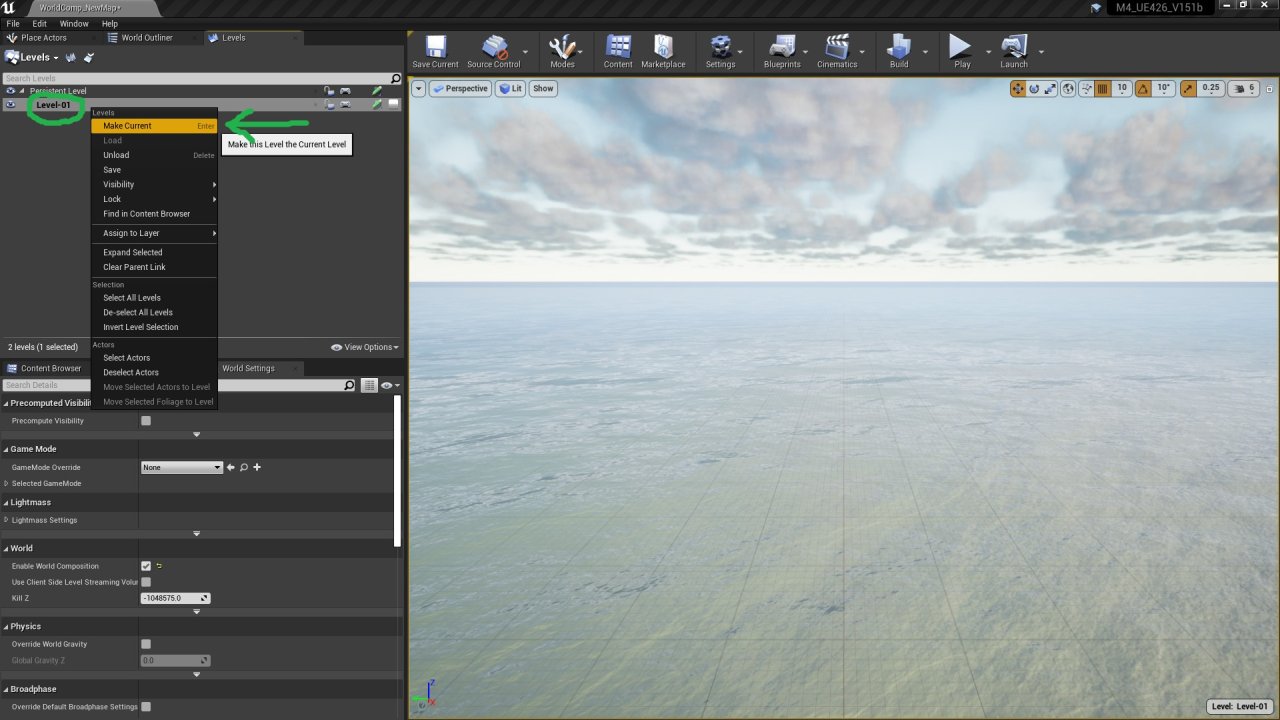
After your new level is created, it will show up in the Levels window. Select your new level and right click it, then choose “Make Current”.

Step 6: Creating Your Landscape Pieces
Now we can start creating our Landscape Pieces. With your new level, as your current level, open up the “Landscape” menu by going to Modes>Landscape in the Editor. Once in here, choose the size of your landscape pieces. The size you choose is important because depending on whether it’s a Epic Recommended size or not, will determine how performant our landscape is. See the image to the right, for a reference on a good size. Once you’ve chosen your size, press “Create”.

Step 7:
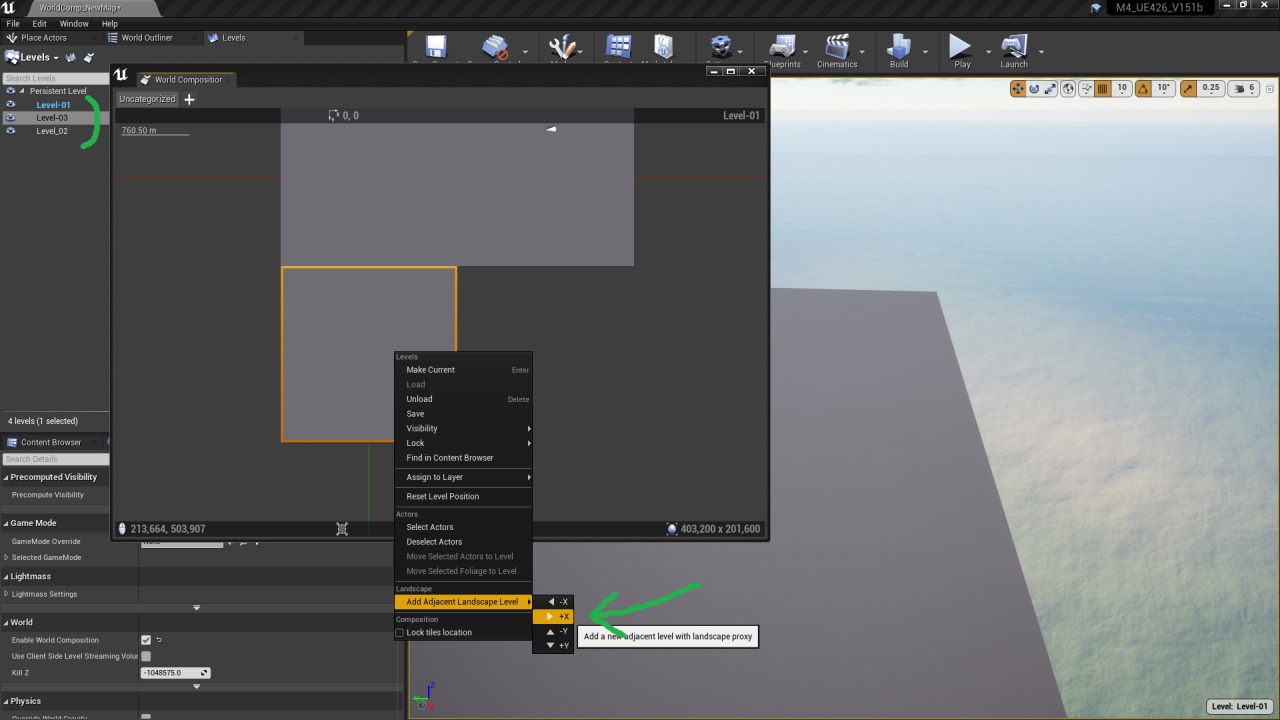
In the Levels Menu, click on the icon that looks like the one circled in the image to the right. it says “Summons World Composition” when you hover over the button in Editor. This will bring up a new window that displays sort of a Minimap of your entire terrain.
Step 8:
In the World Composition Window that just opened up, select your landscape piece, right click it, go to “Add Adjacent Landscape Level” and choose one of the options that pop up. Once you do this, a Save window will show up, save the new landscape piece into the same folder as the Main map that we created at the beginning of this tutorial. Keep making new adjacent Landscape Pieces until you’ve made a larger terrain. Make sure that the end result is square in shape. Just as a notice here too, remember, the Terrain Generator does not support total sizes over 8k x 8k in size, so make it that or less if you’re wanting to use it on this new landscape.

Step 9: Auto Material Setup
Once you’ve created your larger terrain with multiple levels, close the “World Composition Minimap” window and drag + drop the “MagicMapMaterialBP” Blueprint into your level. It can be found in the M4/Blueprints folder. When you’re dragging and dropping this BP into your level, make sure that current level is the first piece that you created. This will be the piece where your “Landscape” component was originally created (It will be called “Landscape” in your world outliner. It’s necessary for the MagicMapMaterialBP and the Terrain Generator to be on the Level where your Landscape component actually is (not just where a piece is) in order to work correctly, as it needs to talk to the entire terrain, not just a piece.
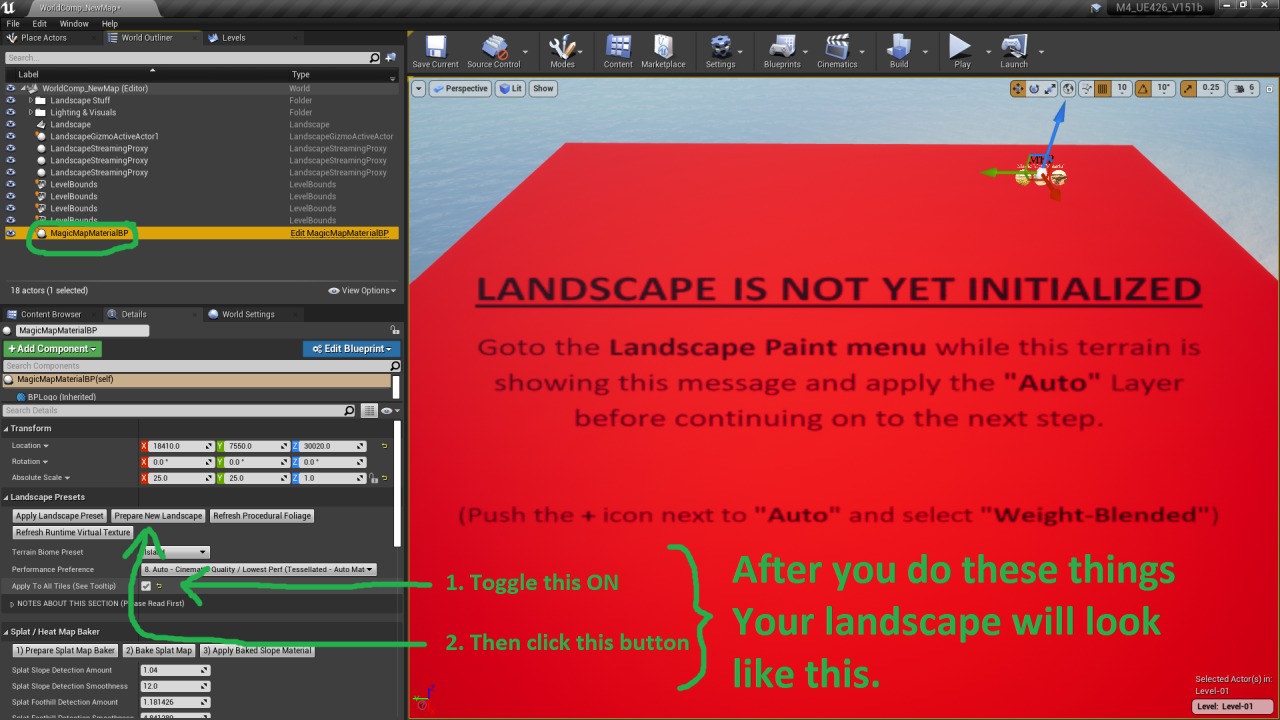
Step 10:
Now with the MagicMapMaterialBP selected, go to the “Details” tab then toggle on the setting called “Apply To All Tiles” and then press the “Prepare New Landscape” button. Once you’ve done this the landscape will begin initializing all the tiles of your World Composition Terrain. After it is finished, your terrain should look similar to the one in the picture on the right, being red and having text on it. Follow the instructions that are explained on your landscape at that time.
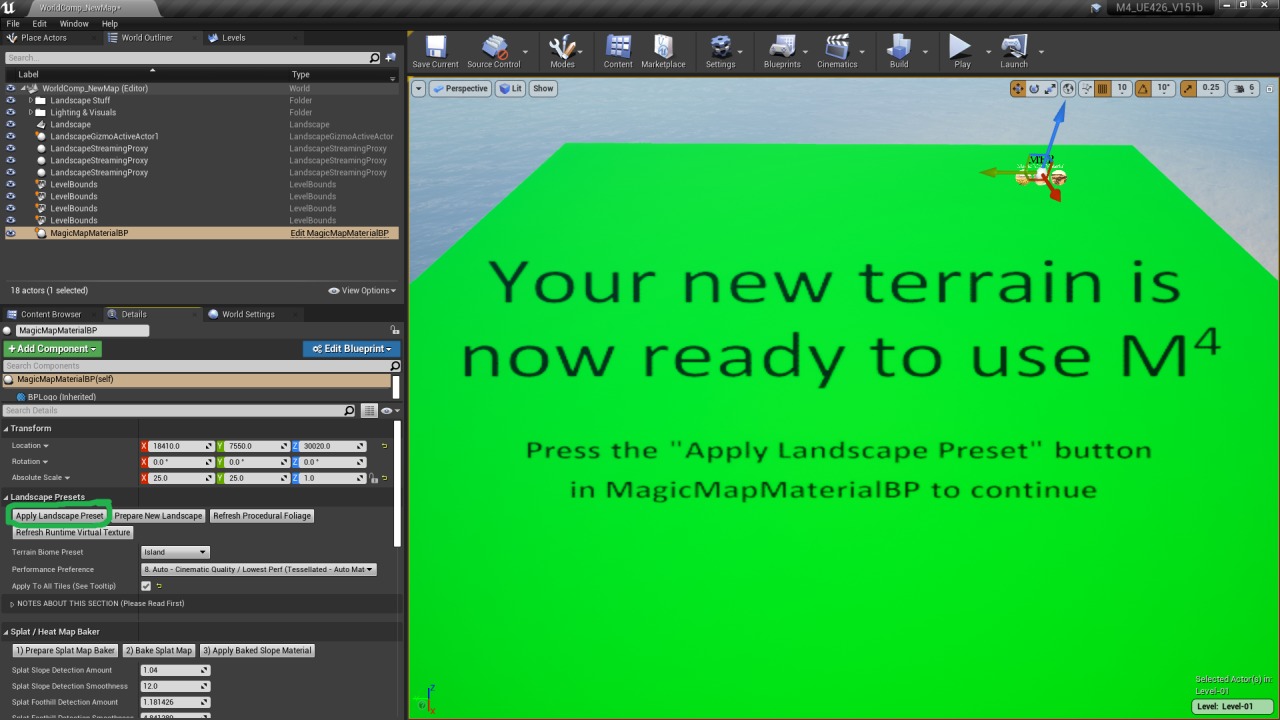
Step 11:
Once you’ve applied the “Auto” layer to your terrain by following the instructions on it, your new terrain will turn green like this image here. Now close the “Landscape” menu and select “MagicMapMaterialBP” again, then press the “Apply Landscape Preset” button. This will apply the Auto Material to your landscape, completely ready to be used.
Step 12: Terrain Gen Setup
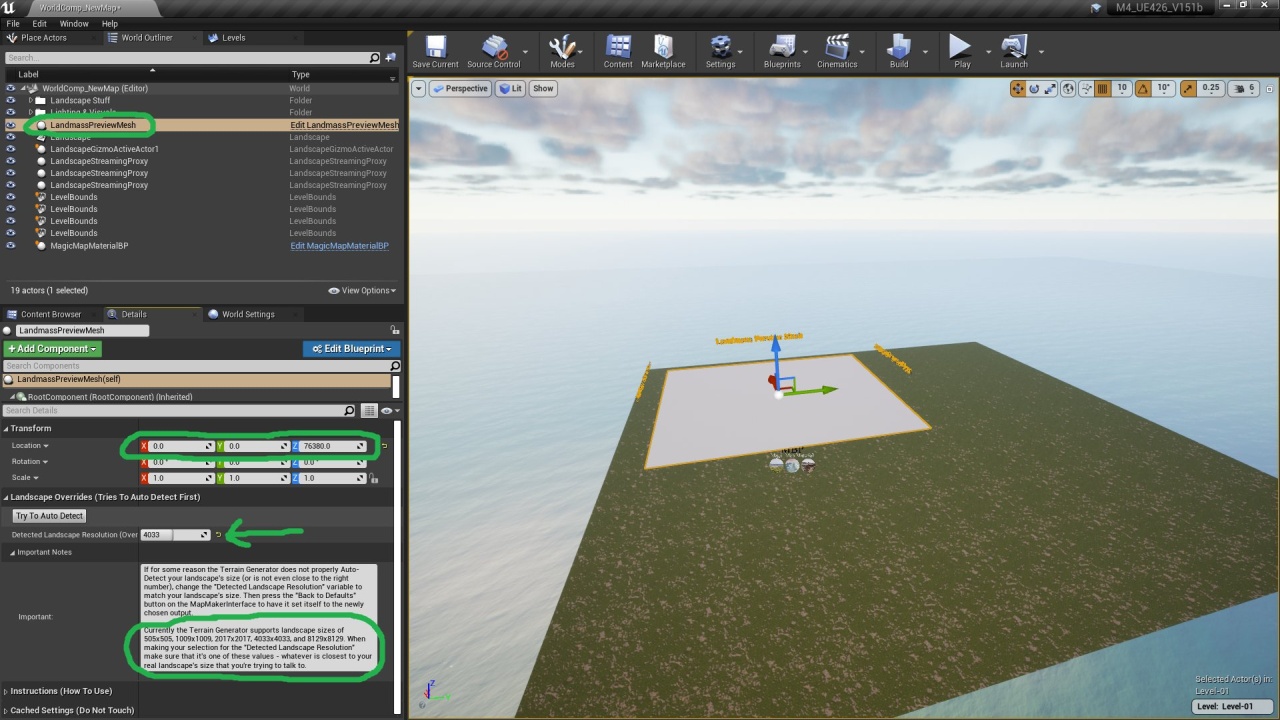
Now that the Landscape Material is all ready to go, let’s get the Terrain Generator working with our new World Comp Landscape. Go to the M4/Blueprints folder in the Contents Browser, then drag + drop the “LandmassPreviewMesh” into the world (make sure the current level is the one with your “Landscape” component on it, like with we did earlier with the material BP).
Once you’ve dropped it into the world, make sure its X and Y location is set to 0, this is necessary for the Erosion to work properly. After this make sure the “Detected Landscape Resolution” is set to one of the supported size (whichever is closest to your landscape’s total size). Currently the supported landscape resolutions are 505 x 505, 1009 x 1009, 2017 x 2017, 4033 x 4033, and 8129 x 8129.
The auto detection will work better in a future update, there still seems to be cases where it is not Auto Detecting correctly, the “Detected Landscape Resolution” slider is offered as a work around until we get there.
Step 13: All Done!
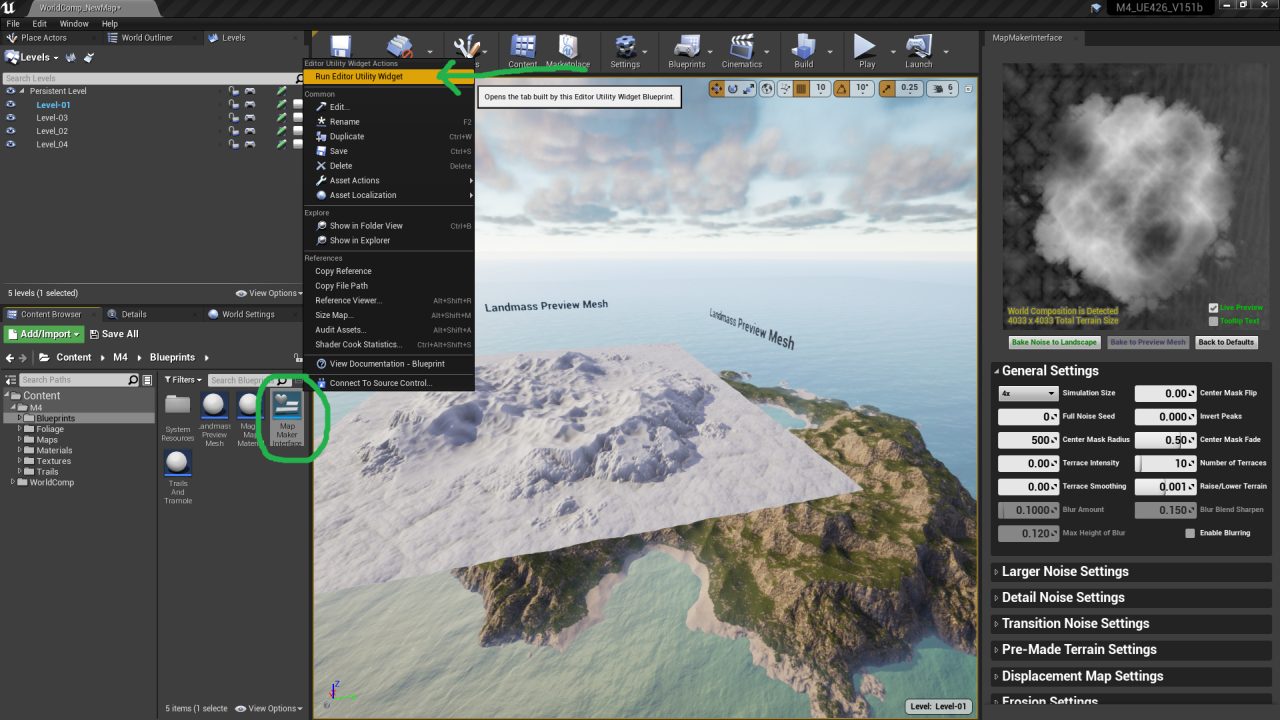
And finally as the last step, go back to the M4/Blueprints folder then right click the “MapMakerInterface” file and choose “Run Editor Utility Widget”. This will open up the Terrain Generator UI (dock it wherever you want), which is now fully set up to work with your World Composition Terrain. Have fun generating! As an extra tip, check the “Tooltip Text” option in the generator to see a description of what everything does when you hover over it.